Creating a desk setup that truly works for you doesn’t have to be overwhelming. Whether you’re setting up a home office for the first time, upgrading your gaming station, or just trying to make your workspace more comfortable, having a clear plan makes all the difference.
I’ve helped hundreds of people transform their workspaces, and I’ve noticed that those who take time to plan before they buy always end up happier with their results. They spend less money on things they don’t need and create spaces that actually work for their daily routines.
This guide breaks down the entire planning process into five manageable steps. By the end, you’ll have a clear roadmap for creating a desk setup that matches your needs, fits your space, and stays within your budget.
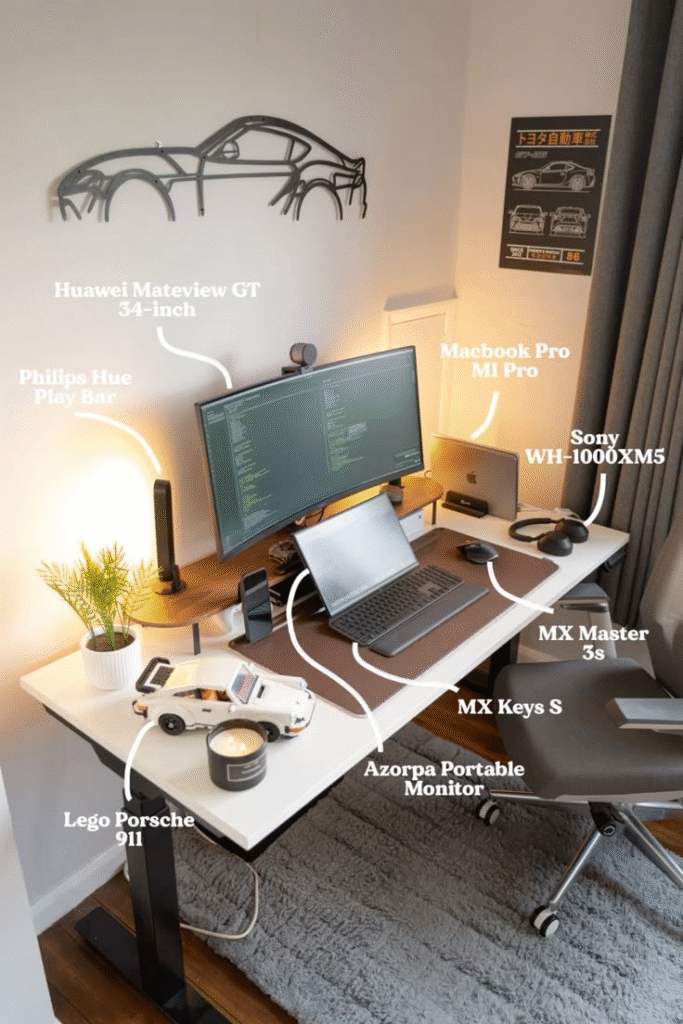
Credit: JordanBarrand5 on Pinterest
Step 1: Define Your Primary Use Case
Before you look at a single product, you need to understand exactly how you’ll use your workspace. This single decision will influence everything else, from the desk size you need to the type of chair that’ll keep you comfortable.
Identify Your Main Activities
Think about what you’ll spend most of your time doing at this desk. Are you primarily:
Working from home? If you’re spending 40+ hours a week at your desk for work, ergonomics and comfort become non-negotiable. You’ll need proper monitor positioning, a quality chair, and good lighting to prevent eye strain and back pain.
Gaming? Gamers need fast response times, space for multiple monitors or an ultrawide display, and room for peripherals like a full-sized keyboard and gaming mouse. Cable management becomes especially important with all those RGB accessories.
Creating content? Whether you’re streaming, recording podcasts, or editing videos, you’ll need extra desk real estate for microphones, cameras, lighting equipment, and possibly a second monitor for monitoring your stream or timeline.
Studying? Students need a quiet, organized space with good lighting and plenty of room for books, notebooks, and a laptop. Storage solutions become more important than high-end gaming peripherals.
Consider Secondary Uses
Most people use their desk for more than one purpose. Maybe you work from home during the day but game in the evenings. Or you study during the week but use the same space for creative projects on weekends.
List your secondary activities and estimate how much time you’ll spend on each. This helps you make smart compromises. For example, if you work 40 hours a week but only game 5 hours, invest more in an ergonomic chair than a gaming chair with RGB lighting.
[Ergonomic office chair for mixed-use setups]
Think About Your Work Style
How you work matters as much as what you work on. Do you prefer having everything within arm’s reach, or do you like a minimalist setup with just the essentials? Do you jump between multiple projects, or do you focus on one task at a time?
If you’re constantly switching between tasks, you’ll need more organizational solutions like desk drawers, monitor arms that let you adjust screen positions, and maybe a second monitor. If you prefer deep focus on single tasks, a cleaner, simpler setup might serve you better.
Step 2: Measure Your Space and Set Constraints
Nothing derails a desk setup faster than buying furniture that doesn’t fit your room. I’ve seen people order beautiful standing desks only to discover they’re too tall for their ceiling or too wide for their bedroom doorway.
Take Accurate Measurements
Grab a tape measure and get these key dimensions:
Available floor space: Measure the wall where you plan to put your desk. Don’t just measure the wall length—check the width from the wall to where you can comfortably place a desk without blocking walkways or doors.
Ceiling height: If you’re considering a standing desk or tall shelving, measure floor to ceiling. Standing desks can extend over 50 inches, and you’ll need clearance above that for monitors or overhead lighting.
Door and hallway dimensions: Measure doorways and hallways leading to your room. A desk that fits in your space but can’t fit through your door is useless. This is especially important for L-shaped or corner desks.
Window and outlet locations: Note where windows and electrical outlets are located. You’ll want to avoid placing monitors directly in front of windows (hello, glare) and you’ll need easy access to power.
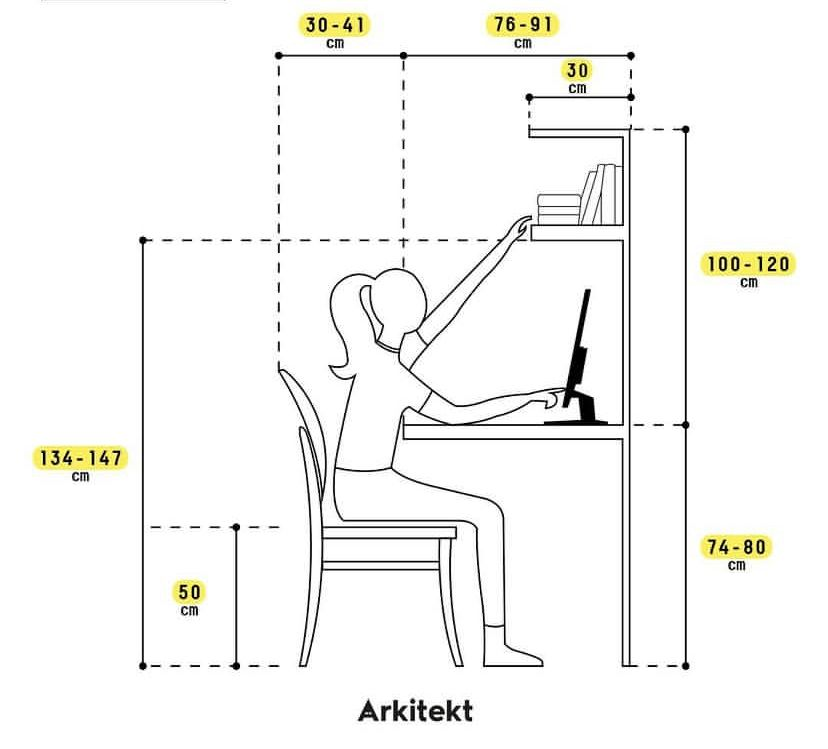
Credit: Arkitekt
Identify Your Constraints
Beyond physical measurements, consider these limitations:
Rental restrictions: If you’re renting, you probably can’t drill into walls for monitor arms or floating shelves. You’ll need desk-mounted solutions or freestanding furniture.
Shared spaces: Setting up in a living room or bedroom? You’ll need to think about how your desk looks when not in use and whether you need solutions that can be tucked away.
Natural light: Is your space bright and sunny or dark and cave-like? This affects your lighting needs and monitor positioning.
Plan Your Layout
Once you know your measurements and constraints, sketch a simple floor plan. You don’t need fancy software—a piece of paper works fine. Mark where your desk will go, where your chair needs clearance to pull out, and where you’ll place other furniture.
A good rule of thumb: leave at least 36 inches behind your chair for comfortable movement. If you’re using a standing desk, add another 12 inches for when the desk is at standing height.
[ Compact desk for small spaces]
Step 3: Set a Realistic Budget
Here’s the truth about desk setups: you can spend $200 or $2,000 and create something functional. The key is being strategic about where you allocate your money.
Determine Your Total Budget
Look at your finances and decide what you can comfortably spend without stress. Be honest with yourself. If $500 is your limit, that’s perfectly fine—you can build an excellent setup for that amount.
Remember that you don’t need to buy everything at once. Many people start with the essentials and add upgrades over time. It’s better to have a $500 setup now that you can use than to wait six months saving for a $2,000 setup.
Allocate by Priority
Once you have a total budget, break it down by category. Here’s a framework that works well for most setups:
Desk (25-30% of budget): Your desk is your foundation. It needs to be the right size and height for comfortable work.
Chair (25-35% of budget): If you’re sitting for hours daily, this is where you should invest. A good chair prevents back pain and improves posture.
Monitor (15-20% of budget): After desk and chair, your display is usually next in importance, especially if you’re working long hours.
Peripherals (10-15% of budget): Keyboard, mouse, and other input devices should be comfortable but don’t need to break the bank unless you’re gaming competitively.
Accessories (10-15% of budget): Lighting, cable management, desk mats, and organizational tools that complete your setup.
Build a Tiered Shopping List
Create three lists for your setup:
Must-have now: The bare essentials you need to start working. This typically includes desk, chair, and whatever display setup you need for your primary use case.
Should buy soon: Items that significantly improve comfort or productivity but aren’t day-one critical. Think monitor arm, desk lamp, better keyboard.
Nice to have later: Upgrades and aesthetic improvements you can add over time. RGB lighting, premium headphones, decorative accessories.
This approach lets you start using your workspace quickly while giving you a clear upgrade path. It also prevents that overwhelming feeling of trying to buy everything at once.
Research Price Ranges
Before you shop, understand what things actually cost. A standing desk might range from $200 for a basic manual model to $800 for a premium electric version. Knowing these ranges helps you set realistic expectations and spot genuine deals.
Step 4: Research and Select Your Core Components
With your use case defined, space measured, and budget set, now you can actually start looking at products. This is where most people jump in too early and end up with mismatched components that don’t work together.
Start with the Desk
Your desk determines everything else. Here’s what to consider:
Size matters: You need enough surface area for your monitor(s), keyboard, mouse, and any other items you use regularly. A general guideline is 48-60 inches wide for a single monitor setup, 60-72 inches for dual monitors.
Height is critical: Standard desks are 29-30 inches tall, but if you’re particularly tall or short, you might need something different. Standing desks solve this by being adjustable, typically ranging from 25-50 inches.
Depth counts too: Most desks are 24-30 inches deep. If you use large monitors or want equipment like microphones or speakers on your desk, consider going deeper (30 inches minimum).
Material and stability: Particle board desks are cheap but can sag under heavy monitor setups. Solid wood or quality engineered wood offers better durability. If you’re using multiple monitors or heavy equipment, stability becomes crucial.
Choose Your Seating
Your chair is arguably more important than your desk. You can work at a dining table if needed, but a bad chair will ruin your back.
Ergonomic essentials: At minimum, your chair should have adjustable height, lumbar support, and armrests. If you can afford it, look for adjustable armrests, seat depth adjustment, and tilt mechanisms.
Gaming vs. office chairs: Despite marketing, many gaming chairs prioritize looks over ergonomics. A quality office chair often provides better support for long hours. Save the gaming chair for setups where you want that aesthetic and can afford one with real ergonomic features.
Test before you buy: If possible, try chairs in person. Everyone’s body is different, and what’s comfortable for one person might be terrible for another. If buying online, check return policies carefully.
[Ergonomic office chair with adjustable features]
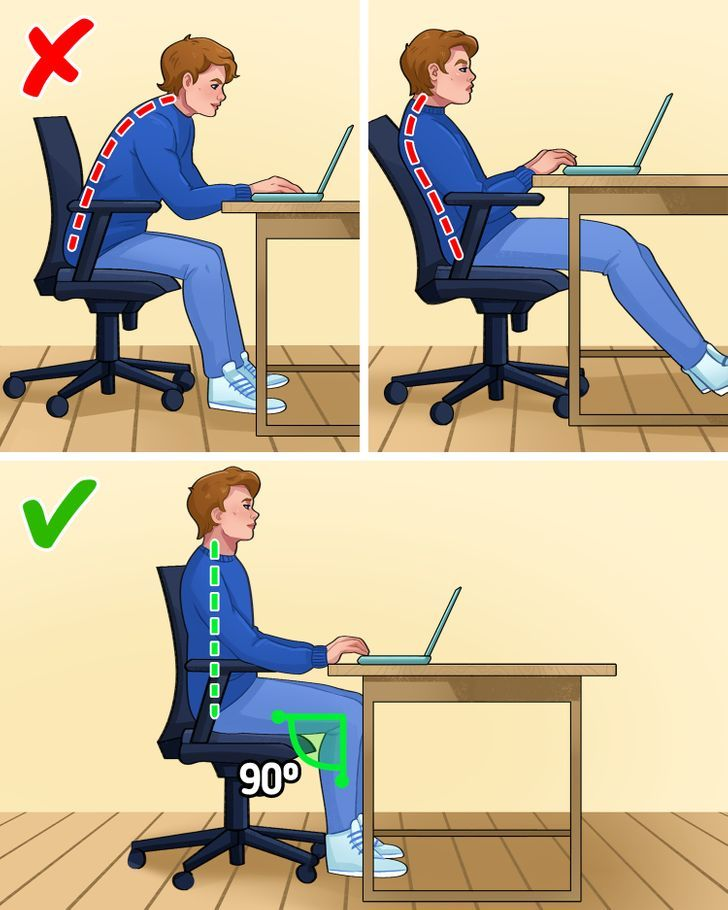
credit: 5 Minute crafts
Select Your Display Setup
For most people, this means choosing a monitor. Here’s what matters:
Size and resolution: For general work, a 24-27 inch monitor at 1920×1080 or 2560×1440 resolution works well. If you’re doing creative work or gaming, you might want larger screens or higher resolutions.
Panel type: IPS panels offer better colors and viewing angles than TN panels but cost more. For general work and content creation, IPS is worth it. Competitive gamers might prefer TN for faster response times.
Refresh rate: 60Hz is fine for office work. Gamers should look for 120Hz or higher. If you do both, a 144Hz monitor offers a good compromise.
Multiple monitors vs. ultrawide: Two monitors give you more screen real estate for multitasking. An ultrawide monitor (typically 34 inches+) provides similar space in one seamless display but costs more.
Pick Essential Peripherals
Your keyboard and mouse might seem like afterthoughts, but you interact with them constantly.
Keyboards: Mechanical keyboards offer better typing feel and durability but can be loud. Membrane keyboards are quieter and cheaper. For mixed use (work and gaming), consider a mechanical keyboard with quieter switches like Cherry MX Brown or Red.
Mice: Wireless mice reduce cable clutter but need charging. Wired mice never die mid-task. For work, prioritize comfort and precision. For gaming, look for higher DPI and additional programmable buttons.
[Quality wireless keyboard and mouse combo]
Consider Lighting Early
Don’t wait until everything else is set up to think about lighting. Eye strain from poor lighting can ruin even the best setup.
Task lighting: A desk lamp positioned to light your workspace without creating screen glare is essential. Look for lamps with adjustable color temperature—cooler light (5000K+) for focus, warmer light (3000K) for evening relaxation.
Monitor lighting: Monitor light bars attach to the top of your display and illuminate your desk without taking up surface space. They’re particularly useful for late-night work sessions.
Ambient lighting: If your room lacks natural light, consider adding floor lamps or LED strips behind your desk or monitor for indirect lighting that reduces eye strain.
Step 5: Plan for Cable Management and Organization
The difference between a desk setup that looks professional and one that looks chaotic often comes down to cable management. Plan for this from the start—it’s much harder to organize cables after everything is set up.
Assess Your Cable Situation
Count how many devices you’ll have and what they need:
- Monitors (power + video cables)
- Computer or laptop (power + potentially multiple connections)
- Peripherals (keyboard, mouse, possibly USB hubs)
- Charging cables (phone, headphones, other devices)
- Audio equipment (speakers, microphone, audio interface)
This gives you a realistic picture of the cable jungle you’re managing.
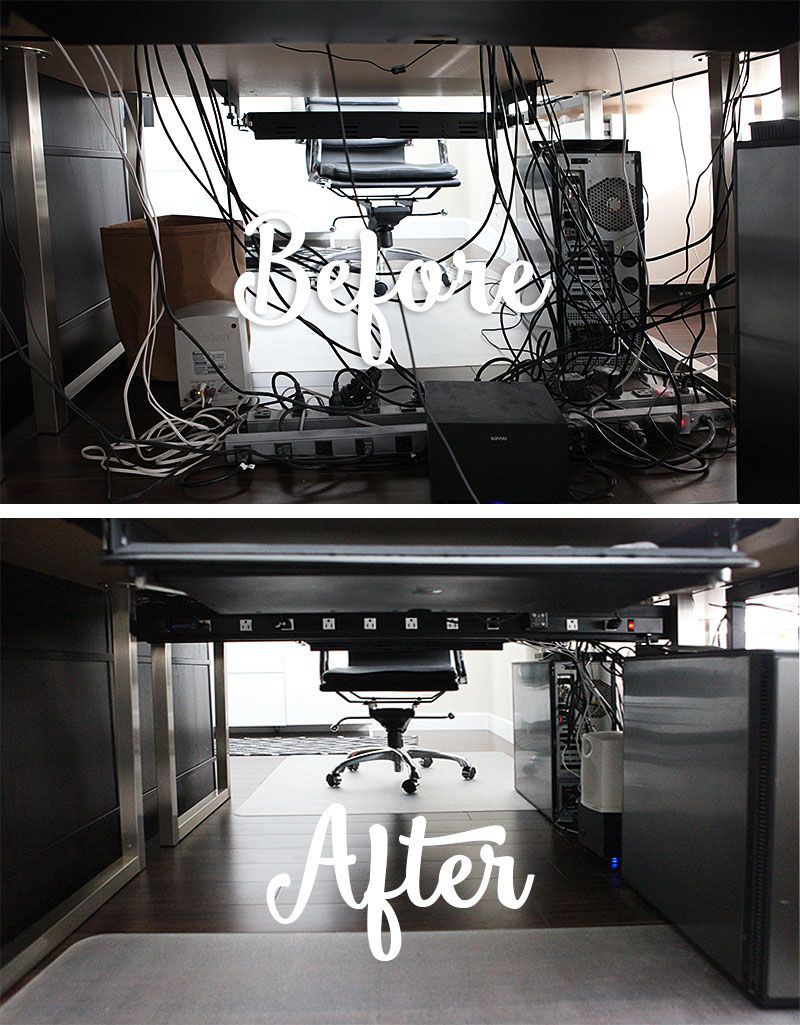
Credit: ahomefordesign.com
Plan Your Cable Routing
Think about the path each cable needs to travel:
Under-desk solutions: Cable trays or raceways mounted under your desk keep power strips and excess cable length hidden. These work best when installed before you set up all your equipment.
Desktop solutions: Cable sleeves, clips, and boxes handle visible cables on your desk surface. These are especially useful for cables you need to access regularly, like charging cables.
Behind-desk solutions: If your desk is against a wall, cable raceways on the wall itself can handle cables traveling to wall outlets or between desk height and monitor height.
Choose Your Cable Management Tools
You don’t need expensive solutions. Here’s what actually works:
Velcro cable ties: Reusable, adjustable, and perfect for bundling excess cable length. Way better than zip ties because you can adjust them as your setup evolves.
Cable clips: Adhesive clips keep cables routed along desk edges or walls. Get more than you think you need—they’re cheap and having cables exactly where you want them makes a huge difference.
Cable sleeves: Neoprene sleeves bundle multiple cables together while remaining flexible. Great for the cables running from your desk to wall outlets.
Power strip with mounting: A power strip that can mount under your desk keeps plugs accessible but out of sight. Look for ones with widely spaced outlets that accommodate bulky adapters.
[Complete cable management kit]
Design for Future Changes
Your setup will evolve. Maybe you’ll add a second monitor, upgrade your keyboard, or add new accessories. Plan your cable management to accommodate future additions:
- Leave some slack in your cable bundles for adjustments
- Install slightly more cable management capacity than you need now
- Keep your power strip accessible for adding new devices
- Document your cable routing (take photos) so you remember what connects where when you need to troubleshoot
Bringing Your Plan Together
Now you’ve completed all five steps: you know what you need your setup to do, you’ve measured your space, you’ve set a realistic budget, you’ve researched your core components, and you’ve planned for organization.
Before you start buying, do one final check:
Does your desk fit your space? Double-check those measurements, including whether it fits through your door.
Does your budget math work? Add up the costs of everything on your must-have list. If you’re over budget, look for areas to compromise or plan a phased purchase.
Have you read reviews? Especially for big-ticket items like desks and chairs, read both professional reviews and user experiences. Look for comments about durability and long-term satisfaction, not just initial impressions.
Do your components work together? Check that your monitor connects to your computer, your monitor arm fits your monitor, your desk has cable management options you can use.
Creating your perfect desk setup is a journey, not a destination. Even after you’ve got everything set up, you’ll probably make small adjustments and improvements over time. That’s normal and healthy—your needs change, and your workspace should evolve with you.
The key is starting with a solid plan. Follow these five steps, take your time with each one, and you’ll end up with a desk setup that truly works for your needs, fits your space, and stays within your budget. Skip the planning and rush straight to buying, and you’ll probably end up making expensive mistakes and feeling frustrated with the results.
Take your time. Do your research. Ask questions in online communities if you’re unsure about something. The few extra hours you spend planning will save you money, time, and frustration in the long run.
Your perfect desk setup is waiting—you just need a good plan to get there.